Monday, July 18, 2022

Laser Printer Printing on Silk

This is a demonstration for the POM guild on1.  how to print onto silk using a laser printer.

Disclaimer 1:  I am not an expert on printing of fabric.

Disclaimer 2:  I only know how to print onto fabric using a laser printer, in this case black ink only.  Maybe for colour laser printers, the method differs.

Disclaimer 3:  If I hadn't left this to the last minute, I would have found silk without deep creases in it, I would have taken a better photograph.

The following are the steps:

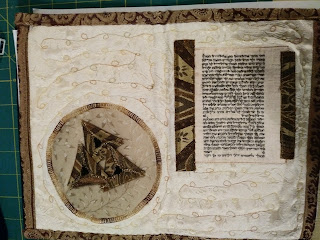
1.  Chose your image - I photographed a  poem, "Es Brent", by Yiddish poet Mordechai Gebirtig.  The poem was in a book owned by my later Aunt Nechama, a book of Yiddish stenography.  Ask me about that one later.


Your image size is limited to the width of the printer paper (8 1/2" X 11"). 

2.  Prepare the freezer paper.  Cut a piece of freezer paper the size of regular letter printer paper (8 1/2" X 11").


3.  Iron the silk.  I used two different silks for the demonstration, a dupionni and a 5mm pongee.  Don't precut the silk to 8 1/2" X 11 - it should be slightly larger than the 8 1/2" X 11" freezer paper. 


4.  Iron the freezer paper onto the silk.  Put the shiny side of the freezer paper on top of the silk and iron on the unshiny side the of the paper.  (Don't ask me about which side of the silk to iron onto because I can't differentiate between the front and back of the fabric). 


5.  Cut the fabric - Preferably using a sharp rotary cutter, trim the fabric the the freezer paper size.  It is important that the cut be exact i.e. no loose threads because they could gum up the printer and make this whole process very expensive i.e. repairing or replacing the printer... and reiron to make sure the freezer paper is firmly attached.


6.  Practice Print - Put an "X" on a piece of printer paper and put the paper "X" up into your printer and print your image onto it. Depending on where the "X"comes out on the paper, you will know how to feed the freezer papered fabric ("FPF") into the printer.


Each printer is different so figure it out before you feed the FPF into the printer.  It may differ if you're putting it into the paper tray or feeding it through like for an envelope.

7.  Printing onto the fabric - Put the FPF into the printer, cross your fingers, and print.

8. Iron the printed image. - Iron on the printed fabric.  I always use a piece of cotton on top of the inked side so that I don't ruin my iron (cheaper than the printer, but still...)


9.  Remove the freezer paper from the fabric.  From the dupionni, it released easily.  From the pongee, it was a little harder.

The fabric can then be used like any other silk fabric, used whole or cut up into smaller pieces.

And so ends my demonstration. 

On another note, Devora has bought me some laser printer transfer paper and I will at some point try that method as well.  I believe that in that one, you print the image onto the transfer paper and then iron the printed image onto the fabric.  It may have advantages because you can print onto smaller and/or irregular sized fabric pieces.


Wednesday, April 27, 2022

Omer Counter

An idea for an Omer counter has been percolating since before Pesach last year when Mintzy asked me if I had any use for her metal sewing machine bobbins.  With her bobbins and my bobbins, we had more than 49 - enough for an Omer calendar.  I saw this one made by Studio Gruss in New York:


I wanted mine to be textile related and in parts that could be dismantled to fit into a compact box, something like this travelling Shabbat candle box I made for a Pomegranate Exhibit.  It was made based on a large match box holder and contains a wooden candle holder with two holes for tea light candles, room for additional candles under the holder and a smaller match box.


I kind of know what I want to do and I think I will use this cigar box as my container.


I'll let you know how (if) it turns out the way I envisioned.


Sunday, April 24, 2022

Time Got Away From Me

I have a valid excuse, well not really, but still.  Carmit was here from Munich for 6 weeks, and Rotem and Maya were here for two weeks and it was Pesach.  And I didn't feel much like sewing.

Let me check where I was at my last post.

Rotem and Maya loved (or maybe just liked) the needlepoint.  They are working on it.  It was actually their 2nd anniversary gift.  I didn't get around to doing their 1st anniversary gift until after their 2nd.  Not that I procrastinated, I just missed their 1st because of Covid brain and only figured out what to give them closer to their second.  I took a wedding photo of theirs and had it made into a jigsaw puzzle.

Not as challenging as the 2500-4000 piece puzzles they usually do but certainly a keepsake in a nice box which they can pull out annually (or not) should they decide to go that route.  Shoutout to The Occurrence puzzle place in Haliburton, Ontario who did a great job on the puzzle.  We may just have to make the drive out ourselves to see how it's done.

And back to needlepoint, Rotem had made two needlepoint pieces which I had made into pillows several years ago.  What was I thinking as far as the brown background fabric goes.  Choopa, Rotem's cat, was particularly enamoured of them either and ruined the pillow fabric but not the needlepoint.  So while Rotem was ready to send them to recycling, I did a little recycling of my own and made them into a bag.


I repurposed a denim under the mattress book pocket no longer used, faux suede pinkish border fabric from my stash and a wide ribbon, reminiscent of a guitar strap, which I had purchased in Fabricland when it was still at Empress Walk.  So these needlepoints will live on.

Did I mention that I have substantially completed the 3rd Torah quilt back?  And made the חזק חזק ונתחזק pieces?

Off to waste more time on youtube.

Sunday, March 20, 2022

Spring


Spring cleaning.  What do I do with this 12" square which has been languishing in my cupboard? It was made as part of a challenge when I belonged to FAT Ladies (FAT being Fibre Arts Toronto).  We met once a month and had monthly challenges.  It was a creative period for me, in the art quilt mode and we had three exhibits at three different library branches.  I was disappointed when the group fell apart but that's life.

So now what to do with this piece?  It was made on a pale green silk background (former dress of Carmit's),  The lettering was fused from cottons in my stash.  The flowers were from a dollar store lei, and beaded.  The quilting was minimal - I liked the random quilted lines of variegated green thread.  The quilting over the lettering was just wavy lines following the word from side to side, less as a design element and more as insurance that if the fusible didn't hold, the stitches would.

I actually like it and think I will hang it somewhere.  Maybe do three more companion pieces. Hmmm.

Saturday, March 19, 2022

Needlepoint

Rotem and Maya got married on March 14, 2020 in Israel.  My entire family, including my (now) almost 101 year old mother had flights booked.  Menachem and I arrived on March 5th and I can't remember now if Inbal, Amit and Doron arrived a day earlier, the same day, the next day...

I saw Menachem packing N95 masks and Lysol wipes and laughed at him for being hysterical.  Who knew?  People had just started talking about Covid.  First, Carmit's flight from Munich was cancelled.  Then my siblings in Canada started  cancelling one by one.  Then the Israeli guests cancelled.  A game of "chicken" was played with the banquet hall to see who would cancel first - if we did, the deposits on the hall stood to be lost.  If they did, they would have to refund the deposits.  In the end, Maya's brother negotiated a compromise.  The wedding celebration was rescheduled for October (the banquet hall wanted August - we balked at having to pay high season flight costs.  In the end, even October was too soon.  The banquet hall cancelled and the deposits were refunded.

Maya Rotem got married in their back garden, with only her parents, brother and sister-in-law, us, Inbal and her kids in attendance.  They exchanged vows under the chuppah I had made years ago ("if you build it, they will come" being my theory at the  time...).  Inbal and her children returned to Canada the next day and we followed about a week later on one of the last flights out.

So where does needlepoint fit into this scenario?  Last year, I missed their first anniversary having totally lost all concept of time.  I vowed that I would not miss their second.  So I started thinking about what I hoped would be a unique gift for a unique couple.


This is the top half of their wedding invitation.  I had it made into this


I emailed the "shoe" photo the a company called "Needlepaint" in Colorado and they translated into a needlepoint kit, complete with tapestry yarn, a print-out to follow


and instructions on the method of stitching.


Inbal went to Israel on Thursday and I sent it with her.  My thinking is that they can needlepoint it themselves and then when they come to visit for Pesach, I can have it made into a pillow.  Or if they don't want to needlepoint it, I'll do it myself and send the finished pillow back to them.

So that was our second year anniversary gift.  I'm still working on the first year one and hope to have it ready by the time they come but can't publish anything until they come.  Hopefully, I can get it done.

And speaking of needlepoint, I found an online program to translated pictures to patterns.  I have an old needlepoint canvas and lots of tapestry yarn, so I just may make a pillow for me.


Wednesday, March 9, 2022

This and that

 The zipper on my favourite fleece jacket broke.  I really don't want to throw it out or pay an exorbitant amount to have it professionally replaced so I will attempt to replace the zipper myself.  I am unable to actually remove the stitching holding it in so I cut off the teeth, will somehow attach binding tape to the front lapels and attach a zipper to them.  It may look a little hinky (is that a word and does it have an inappropriate meaning?) when it's done but it will make me happy to keep it out of the landfill.  Keeping my fingers crossed. 

Did a little sewing done on the 3rd Torah tie back.  I just needed the push to get started.  And yesterday's lunch and shmooze presentation by Shelley on stabilizers gave me an idea.  I'll let you know if it works.

We were at my mother's for lunch with my cousin visiting from Israel.  Except my cousin didn't show.  There was a misunderstanding.  So while we were out, we stopped off at Sew Sisters and I bought their last Northcott world map panel.

And I found clarinet fabric so I couldn't resist.

That's all for today, folks.

Sunday, March 6, 2022

Mazel Tov!!

 In 2015, the POM guild put on an exhibit called "Celebrations" at Darchei Noam synagogue in Toronto.

Honey, Brenda and I decided to do a joint project, a quilted wall-hanging. 

We decided to use fabrics we had.  We used wedding dress and white fabrics to make a medallion for our quilt, and quilt blocks using a yellow/brown/ orange/beige batik charm pack (or maybe 2 charm packs?)  in a pattern called "broken dishes".  It is a Jewish custom to break a dish at the (orthodox) engagement ceremony.  We also looked the the custom of breaking a glass at the wedding ceremony, followed by everyone yelling Mazel Tov.

And so our concept for "Mazel Tov" was born.  We started with the medallion composed of six blocks of white fabrics.  We made 6 blocks, each block having 6 pieces. Do the math: 6 blocks X 6 pieces = 36, double chai (18), auspicious numbers for good luck in the Jewish tradition.

We wanted a 7 1/2" finished size.  We used a freezer paper template that size, cut out its pieces, ironed onto the fabric (six different fabrics in each block), cut 1/4" larger than the template piece, removed the freezer paper and sewed the pieces together.  The process was repeated 5 times.  We had six blocks  which would give us two rows of three blocks each. And the blocks could be rotated so that although each block had the same fabrics, they were in different locations on each block.

I am a little fuzzy here if we embroidered and beaded the seams  of each block before or after sewing the blocks together.  Probably before, because I remember Honey doing a seed stitch at the same time I was beading.  Brenda pieced the batik pattern blocks and 

Now to assemble.  The medallion was put together and the Hebrew letters for Mazel Tov cut from gold silk were stitched by hand by Honey.  We did a "dry fit" and realized we would need a border around the medallion in order to fit the size of the batik blocks.  So we added a 1/2" inch off-white duppioni silk border around it.  And we didn't have enough batik blocks so we,  inserted 2 gold silk rectangles, one on each side.  Brenda quilted it and it hung proudly in the Celebrations! exhibit.

It has hung proudly in my house since 2015.  But those two gold rectangles always looked unfinished to me.  Now it feels finished to me.  Unless a little beading could enhance the points were the diagonal lines meet...

Here is the finished piece.


Saturday, March 5, 2022

Matai Purim? B'Adar

 It's a Purim turkey joke.  You had to be there.

Many years ago, I made this little 9" by 12" piece for Purim.

The hamentashen are fabric circles shaped into triangles and the poppy seeds are black beads.

The Megilla is a photocopy of first page of the megillah  printed onto silk.

I also participated in a Purim postcard exchange.  These are the ones I received.


Embroidery Challenge - Done!

 I finally finished it.  I actually finished a few days ago but didn't know how to "frame" it.  It was too big for the 14" embroidery hoop.  I went to Michael's on Wednesday looking for a larger hoop.  They didn't have any.  Then I thought about a metal macrame ring but they had either 14" or 19".  I ended up buying this:

16" was too big so I shaved 1/4" off the foam all around and tried taping the edges with white electrical tape.


 At this point, the foam was shedding.  I tried covering it with plastic film (saran wrap) but it wouldn't adhere and I wasn't happy.

Then a light bulb moment.  If I took the 14" frame outer hoop, removed the screw and glued a 1" piece of tongue depresser/popsicle stick between the two ends, I could enlarge the size of the hoop.  

I made a sleeve of fabric attached to the rainbow binding tape and pulled.  It worked but the embroidery fabric sagged.  So I cut a circle of foam core using the outside of the inner embroidery hoop as my guide.  I place that directly on the back of the embroidery piece, and put the inner embroidery hoop in to hold the foam core in place.  Placed a cord in the sleeve and pulled tight.  

Et voila - the front.

And the back.


So happy it's done.  Photo sent off to the POM for the Zoom challenge reveal on Wednesday night.

Wednesday, March 2, 2022

My "Auspicious" Beginnings as an Artist

My cousin is visiting from Israel.  We are getting together for lunch at my mother's house.

We have been talking about what's happening in Ukraine and although our family, both on my mother's side and my father's side, come from shtetls there, they didn't leave Ukraine to find a better life in Canada.  They left Ukraine to stay alive.  My great grandfather on my father's side was murdered in a pogrom.   Although on my mother's (and my cousin's) side no one we know about was murdered in the pogroms, their flight from Ukraine was a question of survival.

In anticipation of our lunch meeting today, I was looking for this:

This is an interview with Rachel Bardenstein, came to Canada before my mother's family.  The interview was conducted by Rotem circa 1994.

So now I come to the "artistic" part.  While digging through old paperwork, I came across my Grade Three - Four report card.  Note the marks for Arts and Crafts.


Enough said...

Sunday, February 27, 2022

Binding

 I ordered some rainbow binding to finish off my Embroidery Challenge Piece.  It arrived yesterday, very nicely packaged.  I was going to show the front of the envelope also but perhaps shouldn't publicize my address.  I mean, you could look it up if you wanted to, but why?


And this is what it looks like pinned onto the piece.

I have sewn it down but am trying to figure out how to get the piece to stretch evenly in the embroidery hoop.  Or alternatively, to make it into a circular piece not in an embroidery hoop.

Decisions, decisions.


Wednesday, February 23, 2022

Embroidery Challenge - ongoing

The problem is often deciding when to stop.  So I think I'm done.  Now to finish it off so it can be displayed.

Monday, February 21, 2022

Embroidery Challenge- continuing

About a year ago, the Pomegranate Guild of Judaic Textiles, Toronto issued a challenge to its members:  Challenge 2021-2022 Journal Threading.

"Journal Threading is also known as a Stitch Diary. For those who like to embroider or cross stitch, and/or keep written diaries, this is a combination of the two. The template is a 12 section pie chart. Sections can be divided into months (Hebrew or secular), or seasons, or family members, etc. You can make tiny sketches or stitch freehand of an event on any day, or your feelings, or where you went -or the room you stayed home in- because we haven’t gone anywhere, or the weather (very Canadian!) There are no rules for making a stitched record of something that the day happened to bring to mind. The goal is to create a piece that is personal to you. Each section represents a month. If you are a planner, you can draw a whole week’s worth of doodles in the section you are working on, and stitch them with all different threads. If you don’t stitch every day, and like to wait until you have a week’s worth, doodling every day is helpful. Mark your designs on your fabric with the Micron pen or fabric pencil."

This is what I focussed on: There are no rules. 

So instead of using a 12" embroidery hoop, I used an 18" hoop.  Instead of a pie chart, I made a crazy quilt background of pieces from my (mostly) family wedding fabrics stash.  I first divided an 18" freezer paper circle into four equal quarters, and then subdivided those quarters by 3, in random shapes.  I numbered them to know how to put them back together, ironed each pieces onto the front of the fabric pieces, cut them out leaving a 1/4 inch seam allowance, and then sewed them back together.

Of course I didn't start this project a year ago and have only been working on it since approximately January 2022.  Don't judge me.

Unfortunately, I did not take a "naked" circle photo.  This is what it looked like after I did the initial embroidering on the seams. 


I also quickly abandoned use of the frame for stitching because I don't like using a frame.  Needless to say abandonment is never a good thing.  The fabric bunched up in certain places
and the circle is no longer 18".  But this is what it looks like now


I  the name of a month in each of the 12 pieces.  I haven't handwritten Hebrew in a long time so my letters are a little wobbly and frankly the initial stitching was terrible.  I "fixed" that problem by weaving a thread over and under the initial stitching.  It beefed up the lettering and looks not too bad.

So how to remedy the less than 18" problem?  If I want to still use the embroidery hoop as my frame, I need to add about 1/2" to 1" to the perimeter.  I found a lovely rainbow-coloured binding tape on Etsy which I hope will do the trick.  I have been very diligent about reining in my consumerism which wasn't all that rampant pre-Covid but still.  

Although the embroidery part in substantially completed, I think a little beading would enhance it further so a little beading it is.

My "final" Embroidery Challenge photos will follow when finished.

Saturday, February 12, 2022

Scissors and Swiffer Dusters

I don't have a ton of sewing scissors.

I These were my Aunt Ethel's.


And these, my cousin Alissa gave me.

Both pairs are too heavy for me to use.  They usually just hang out on the wall beside my sewing tables.

When I need to cut fabric by scissor, I use one of these

Usually the black pair because (don't tell anyone) I have been known to cut paper with the blue ones...  I usually cut my fabric with my Olfa 45 mm rotary cutter.

I used to have a pair of pinking shears in Israel.  They broke, I'm not sure if still in Israel or here in Canada.  And frankly, I haven't really needed them so didn't bother replacing them.

I am trying to be more conscious of my consumption and how I dispose of things.  Mintzy sent me a pattern for a Swiffer Duster replacement made from flannel, to be used and thrown in the laundry (instead of the garbage).  Since I have an old pair of flannel pajama bottoms, I thought I'd give it a try.  I mentioned it to Honey who had 3 pairs of pinking shears and was generous enough to give one pair to me.


BTW, I snipped through a scrap of fabric and they cut like a charm.

So before I start on the duster, I'm putting on these 


my father's magnifying glasses, and checking out who made the various scissors.

Aunt Ethel's pair have two stamps "made in Germany" and "forged steel".  

Alissa's pair has two stamps 


The first side has a stamp on one side which looks like a cloud and says "WISS, Newark NJ, made in U.S.A." The second side has a stamp which looks like a forge and has "steel no. 21" inside the forge.  I tried looking up WISS on the internet and found stuff but don't know how to copy it.  Suffice it to say, it was once a well known and sought after brand, initially as medical scissors in WWI.

My two most used are generic - the blue one was bought as part of a set I got,my favorite brand "on sale", most likely at Fabricland when it was still on Yonge Street above the North York subway station.  The black handled pair simply says "stainless steel korea" and has an image of something that looks to me like a dolphin on the flip side.

Now Honey's pinking shears are stamped "Haddon Hall" and "Japan".  Right now, all I care is that they cut.  Off to hellosewing.com/diy-reusable-swiffer-duster-cloths/


Wednesday, February 9, 2022

Not every post needs a catchy name.

Yesterday, I "presented" my half-assed papermaking adventure to the POM L&S group.  It was well received by those with no idea how to make homemade paper, and fortunately those who did offered their knowledge and suggestions.  I did, however, start off the presentation with a disclaimer that I had no idea what I was doing and that anyone "inspired" by my presentation should check out information on their own.

I also talked a little about my blogging and its benefits (for me). 

So now I am challenging myself to do something with the 8 pieces of homemade paper I made.


I'll have to think on that.  

In embroidery news, I have embroidered all but two months on the POM challenge and am hoping to finish Sivan and Nissan today.

Saturday, February 5, 2022

Papermaking

The path to my papermaking adventure is somewhat long, but I hope not too boring.

My sister and also a POM member, Devora, wanted to do something together.  In 2017, we took a marbling on fabric course with Sabine Spare, who later presented at one of the POM meetings.

This is the result


We were looking for another fun art-related thing to do together and decided to take a paper-making course.  We found a place in New Dundas, Ontario called "The Paper Trail" and were all excited to sign up as soon as I returned from my son's wedding in Israel, in March 2020.  See where this is going? Obviously, we did not take the course.  I did, however, in June 2020 order handmade paper from them, in two sizes - 5" X 7" and 8 1/2" X 11".

So the paper was delivered and what was I going to do with it?

First I made these, using bits and pieces from leftover fabrics from my nieces' tallitot, wedding dresses, buttons, beads, etc:


I bought this frame from Dollarama:

 
And framed them.  So for $12.00 for the frames, $3.60 for the paper (plus tax), I had this:
I also made these:


I also used my laser printer to print these music pages from my father's Klezmer book:


Just a note here that this paper is quite thin if it can go through the printer.  I did the music on a larger sheet and tore it down the middle to give it the same unsmooth edge.
 
  
This burst of paper creativity ended a few months later when I returned to my quilting
and sewing

And then a few months ago Devora and I took an online course at the Aga Khan Museum about illuminated manuscripts which included papermaking  where the papermaking involved many steps including machinery and equipment
 
I decided to consult with my new best friend You Tube and found tens of videos showing how to make paper using as little machinery and equipment as possible