I made crazy quilt blocks years ago. I had one which I finished but never "framed". The colours were not my usual pinks, purples and blues but rather browns, rust, oranges. Looking through "stuff" my mother gave me, I came across an Israeli made tea towel (shows you how old that one was) and decided to use it for the frame. ?
Long story short, I had a strip left of about 8 cm wide and 36 cm long. I wanted to make something like this, a ceramic piece Inbal had gifted me from a trip to Arizona.
I tried my hand at air dried clay. Total failure. So not my medium. So I decided to try making something from fabric. Several years ago, POM had a workshop using flexi-firm stabilizer. After the workshop, I noticed that people had used a small piece of it and thrown the rest away. I went garbage diving and pulled out the leftovers, for "future" use.
I cut the pieces into squares and rectangles, and sewed them together into larger pieces. So I have a bunch of 8 cm pieces.
I figure if I make a sandwich with an embellished top, two 8 cm flexi-firm pieced pieces, back it with felt and zig-zag the edges, I should have a comparable small art work.
On top of each tea towel piece, I centred a diamond shaped piece of, what else, fabric from another old project. Then I attached a metal bird and several beads, et voila. Still have to figure out how to hang it but I digress.
Three more and I'll be done.
Update: not sure I'll make them into little hangings. May just make them into fridge magnets.
And I whipped up some more, also from bits and pieces.
This is part of a crazy quilt project I started years and years ago. I had made abut 8 of these blocks, intending to do the seams with the embroidery stitches on my machine. After I had done most of the stitches, I didn't like the feel so I painstakingly unpicked them and dismantled the quilt.
I went to Fabricland and bought fabrics which contained blue and other colours and made separate crazy quilt blocks, using the additional colours in the borders to inform my embellishment colour choices.
While searching for something in my stash, I cam across this unfinished block. I also came across a sleeveless cotton blouse Inbal had left behind. I decided to make a shidduch.
I will now (starting December 15, 2024) embellish with some of the below.
December 19, 2024 - Finished (with triangle corners on back for hanging).
I really enjoyed this one, auditioning the reds, blues and beige/peaches. The fabrics are mostly from wedding dresses and the findings I have accumulated along the way. I find that I really like embellished crazy quilt. Shaking hands, however, do not make for easy needle threading.
Susan Rose demonstrated at L&S how she made fabric bowls for her guild's sale at the Calgary Film Festival. I took her instructions and improvised in keeping with my commitment to use what's in my stash.
Long story short, this is the bowl I made.
Front
Back
Side view.
Quite fiddly because of the stiffness of the flexi-firm. Might try it again with regular quilt batting.
If you want more explicit instructions, contact me.
I actually started this post on November 19th and worked an hour here and an hour there until completion.
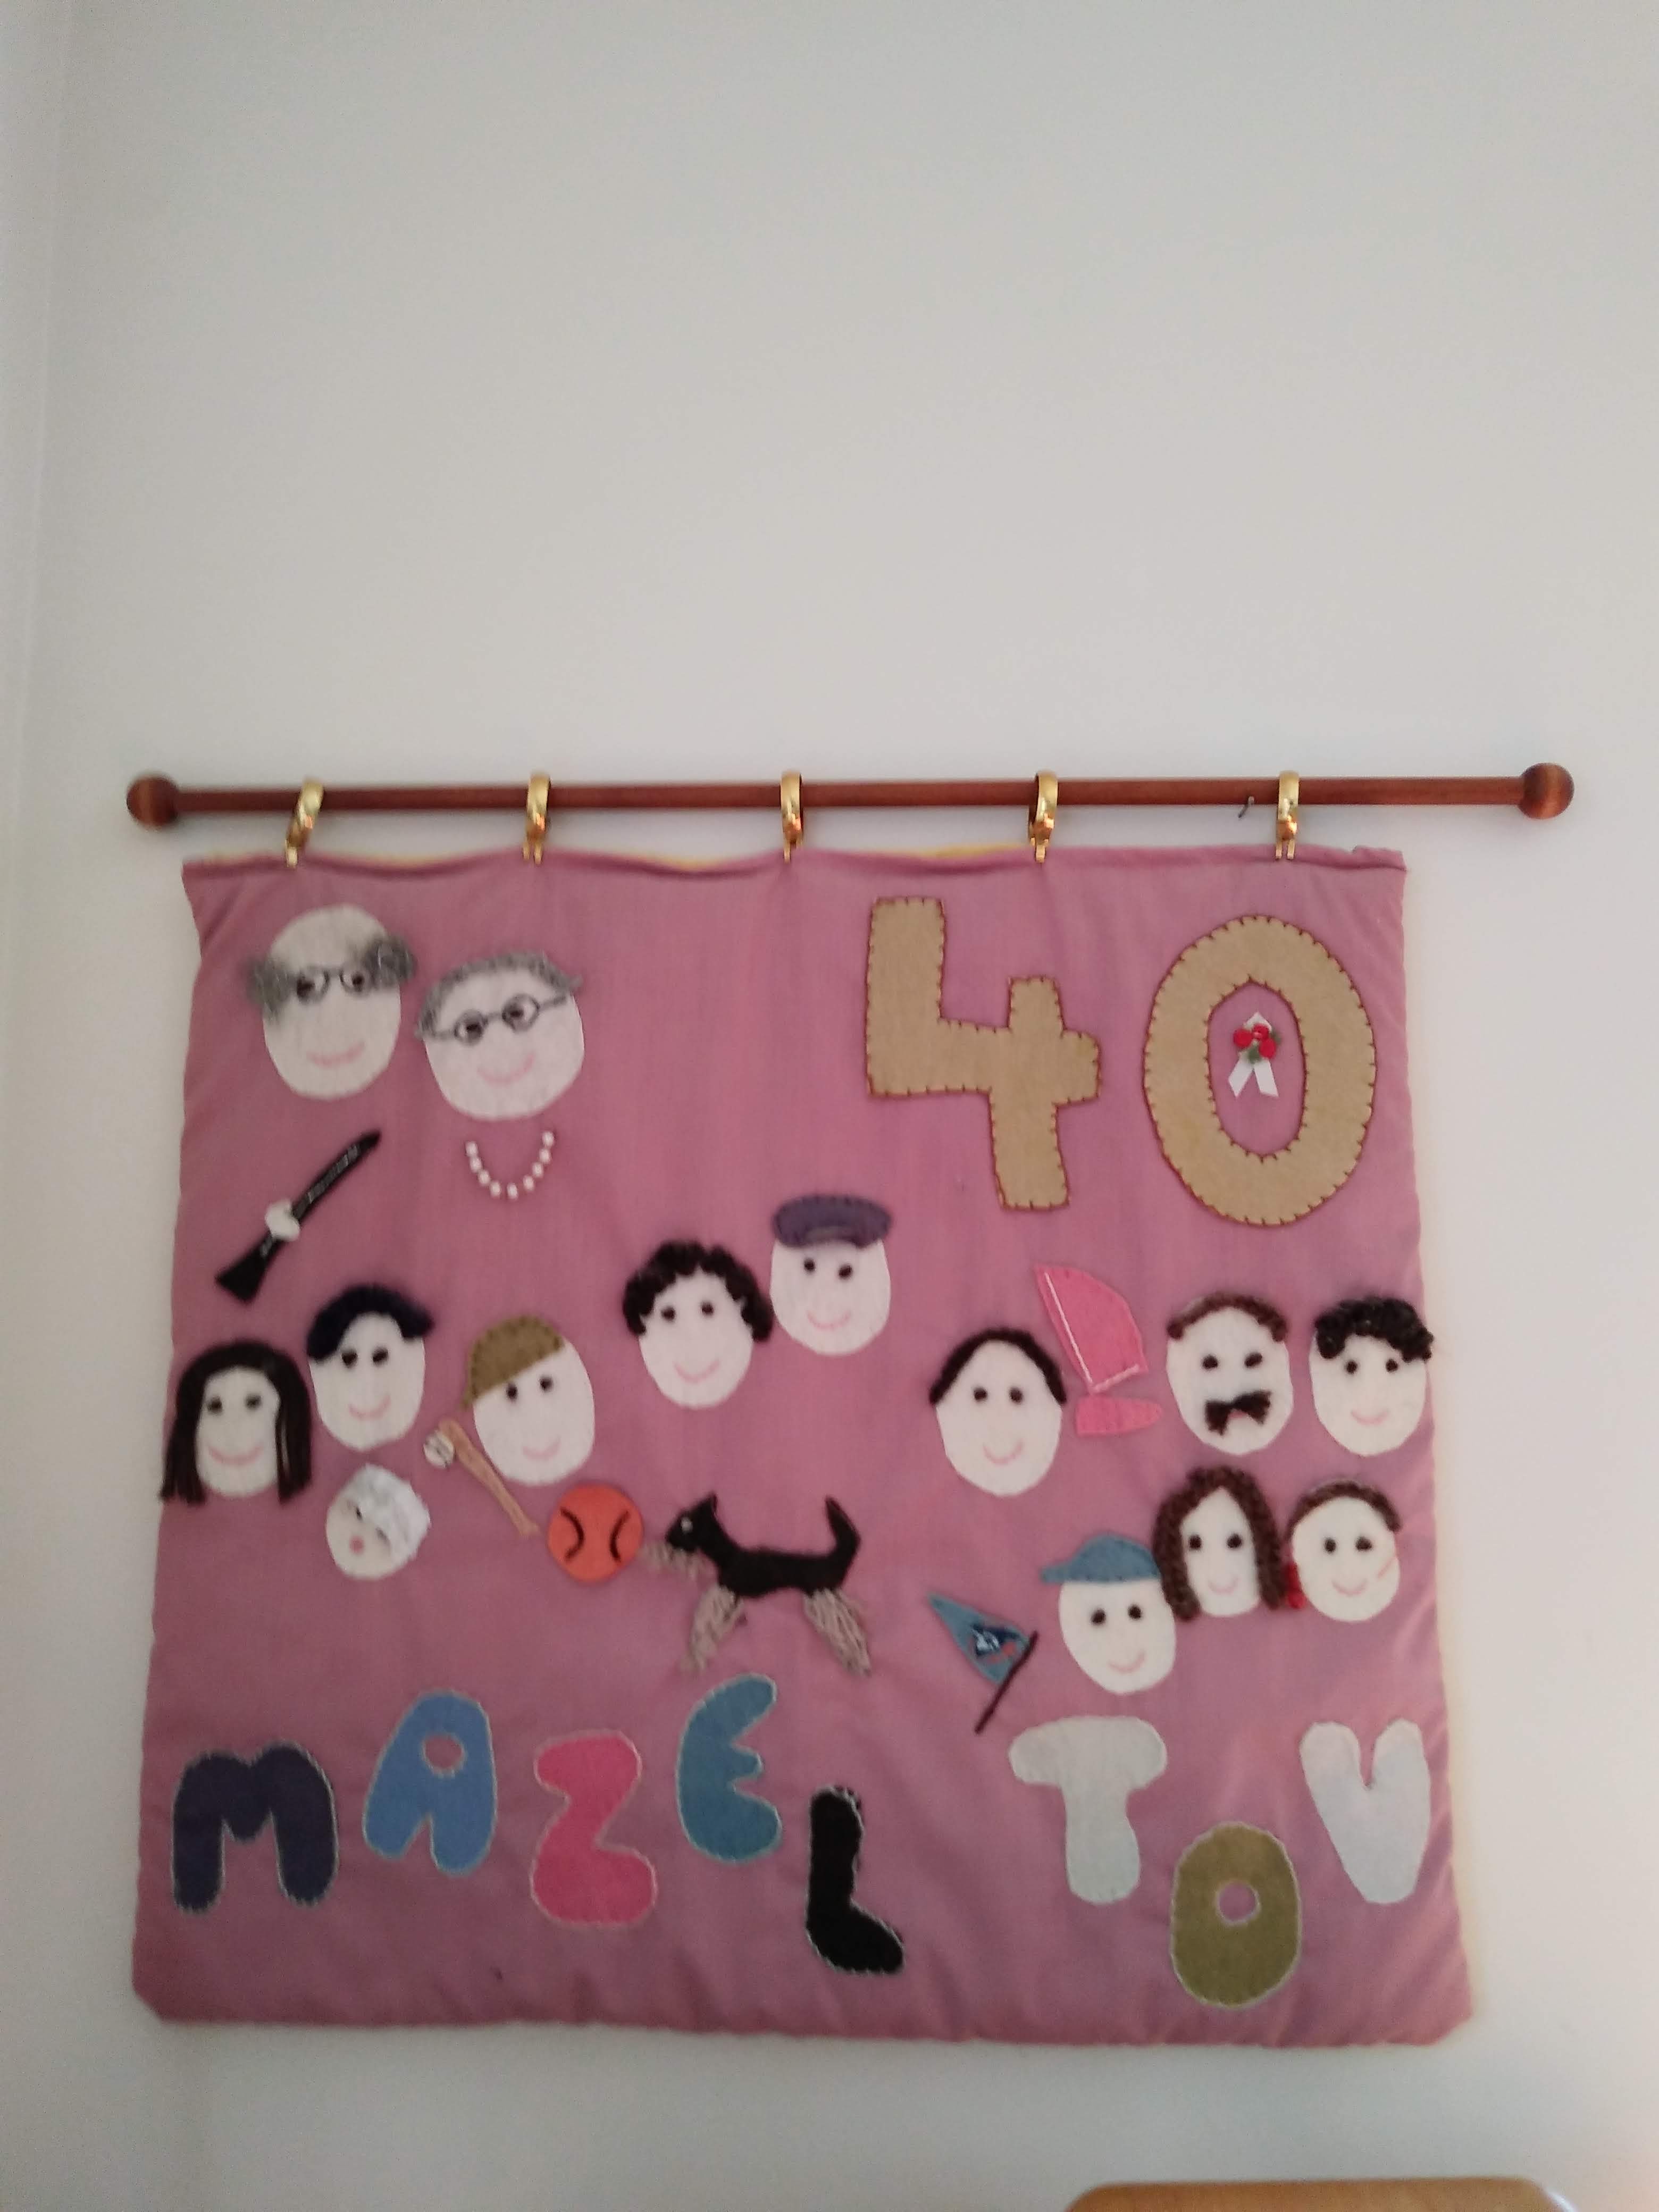
Shellie noticed this wallhanging in the background on one of our Zoom Lunch and Shmooze meetings.
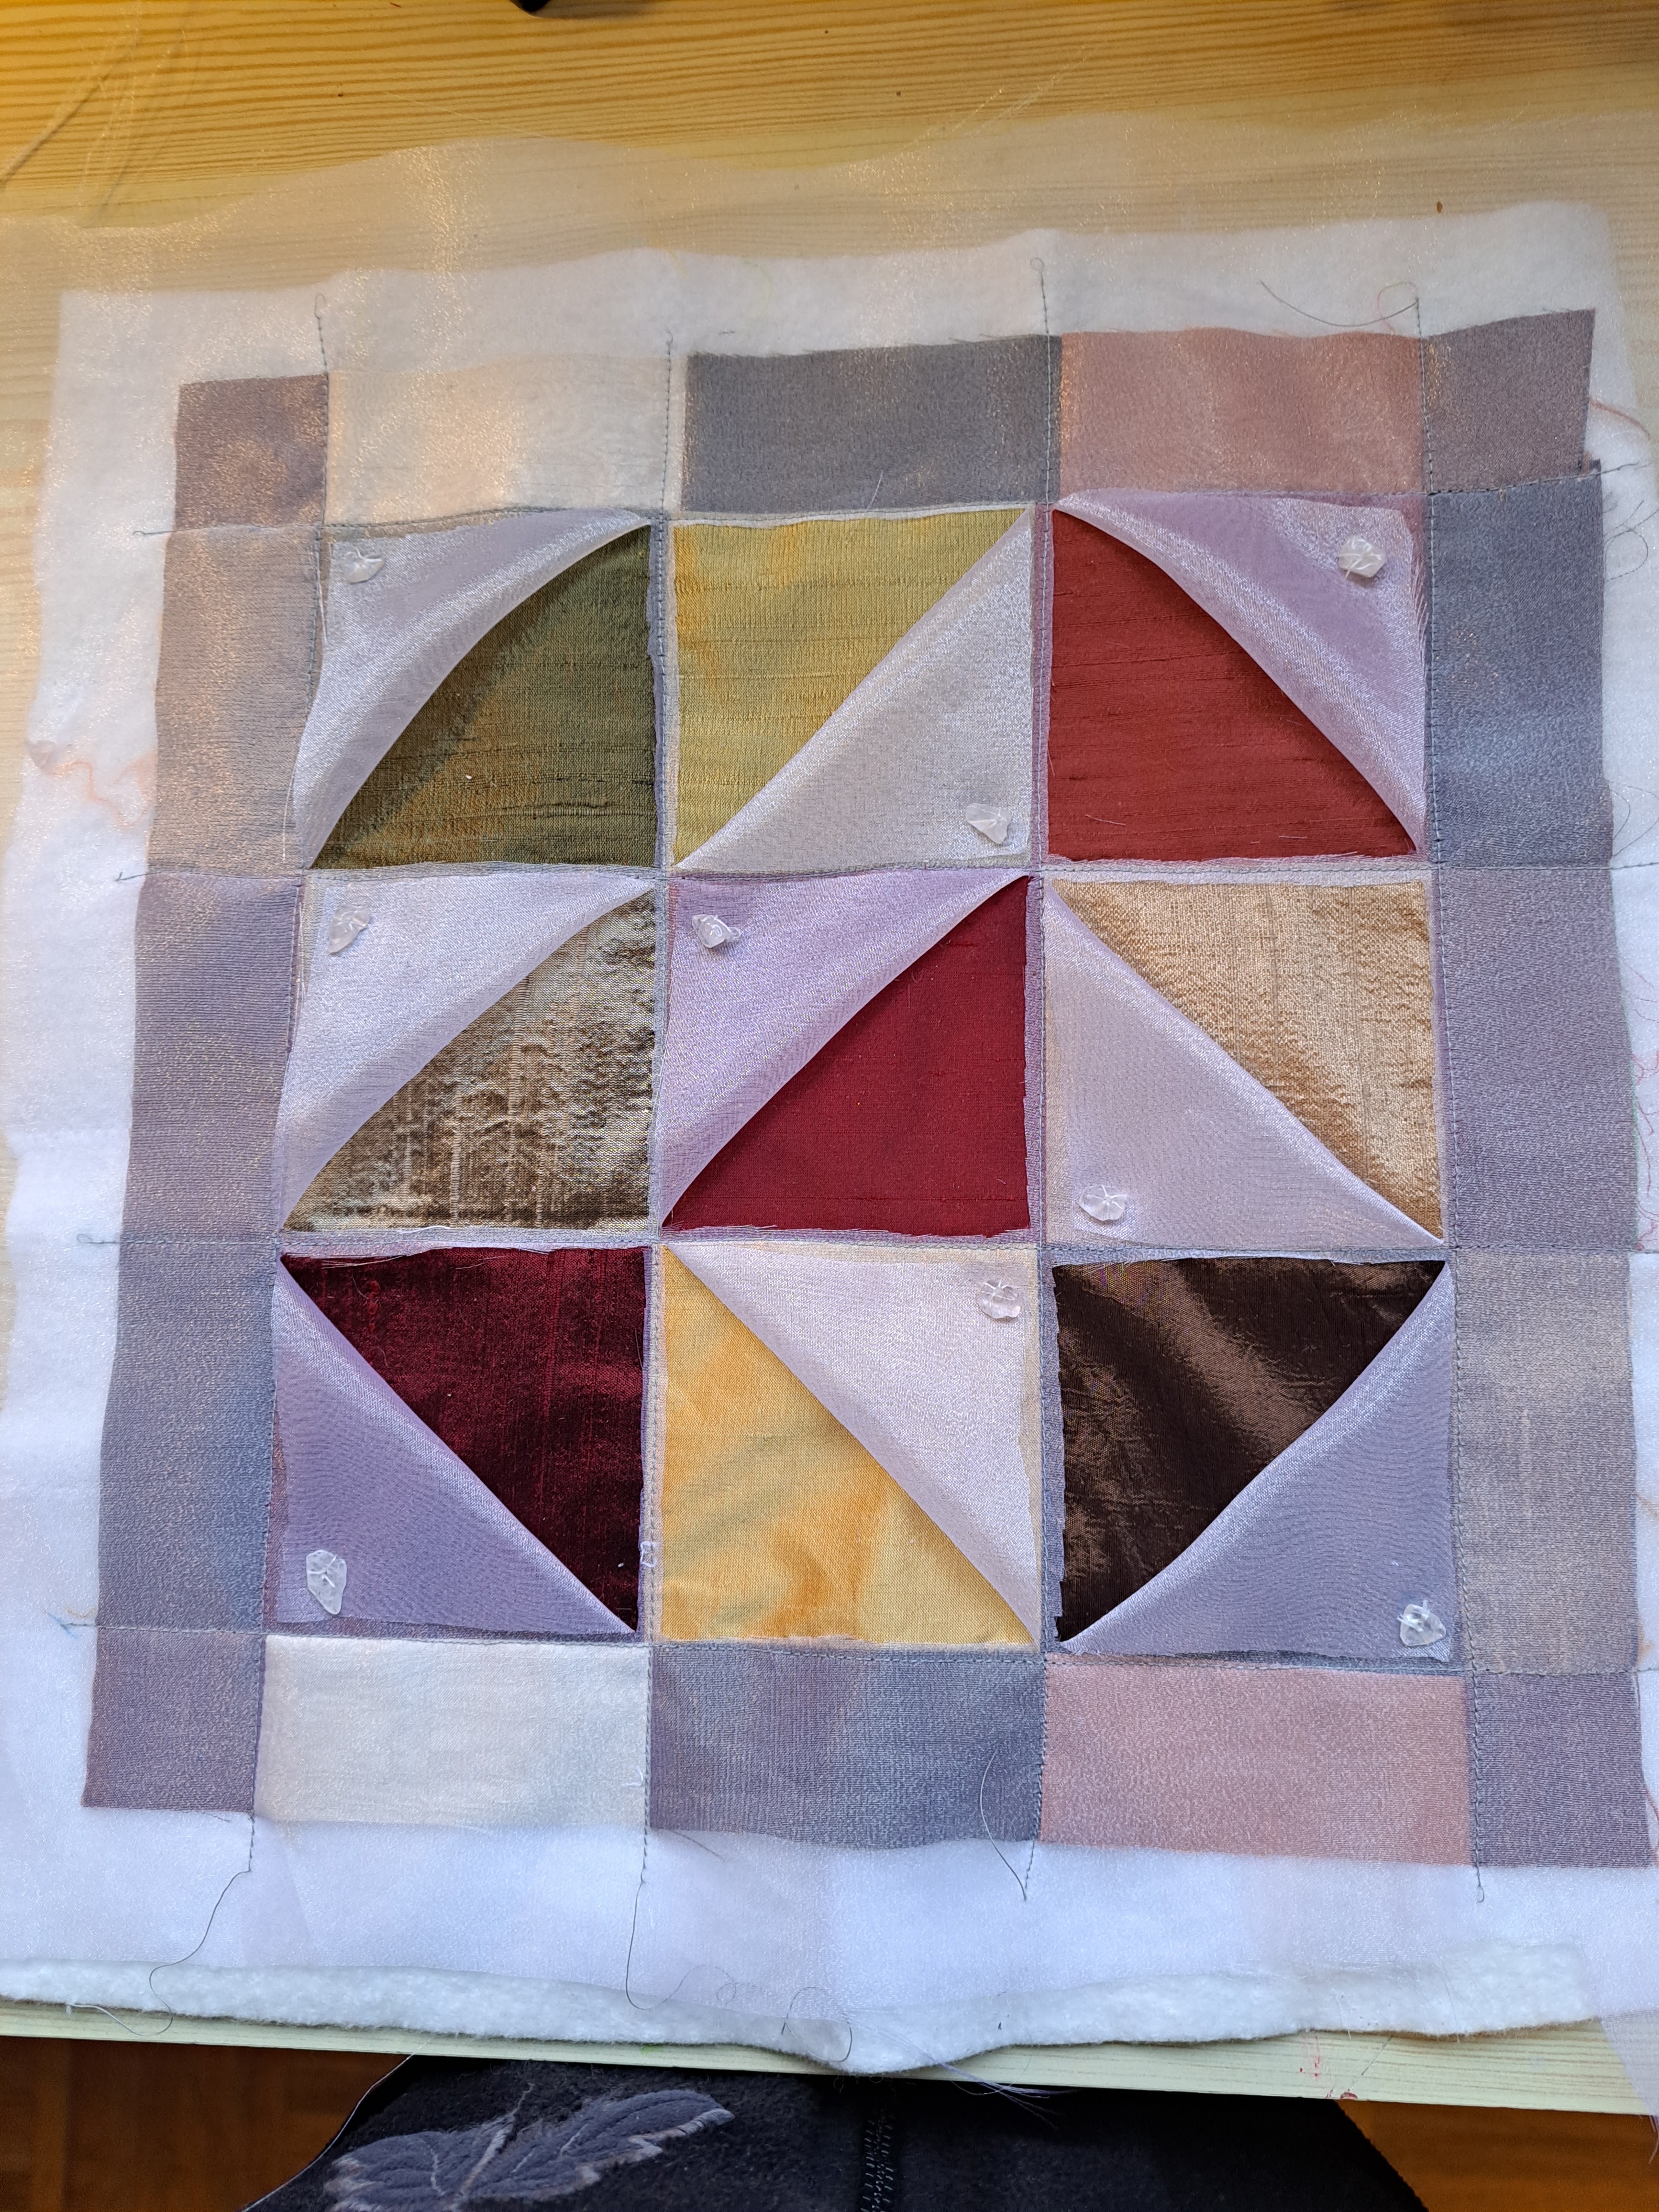
This was a piece I made as a monthly 12" square challenge I made in a quilt art group I belonged to several years (perhaps already more than a decade) ago. I discovered this one while =-for something else. I know I made at least one more - it was shades of mauve and purple.
So I am about to revisit the technique, make a new one using materials from my stash, and make a demo post for anyone interested.
It starts with 16 3.5" squares. I am using duppioni silk from my stash and I am backing it with lightweight fusible interfacing to minimize fraying.
I cut out the interfacing 3.5" squares
and ironed them onto the duppioni silk.
Then cut out the silk squares and laid them out in a 16 patch (4 rows of 4 squares).
The exposed squares will be a 9 patch. Decide which squares will be the 9 patch.
Sew the squares into 4 rows of 4 squares.
Take the row which is not in the 9 patch and cut it in half lengthwise and place one half above the 9 patch rows and one below the 9 patch rows.
Now sew the five rows together.
You are almost there. Once you have the block, cut the right hand column in half from top to bottom and place the 2nd half to the left of the 9 patch.
You have now completed the base block., with full squares in the middle and half squares around the perimeter.
Of course, measure twice cut once didn't work. When I cut the side piece in half, I didn't take into account the 1/4" seam already sewn so the side pieces were out by 1/4". I remedied this by cutting 1/4" inch off the other three sides et voila - an 11 3/4" block...
Next step is batting. I had some pieces of batting cut from other projects and sewed them into a square slightly larger than the block. They were a little wonky but I don't think it will affect the finished piece.
I placed the block on top of the batting.
I then cut a piece of organza (I think it is synthetic organza) also slightly larger than the block and placed it on top of the block.
I then sewed this sandwich along the seam lines in a grid.
Now the fun part.
The organza is cut in each square along two sides and then folded back into a triangle.
I used scissors to cut so the organza edges are a bit rough.
Better to use a seam ripper, but make sure not to cut into the under
layer or through the stitches. I guess a bit of masking tape could make
a stopping point and then easily removed.
The direction of the triangles is not that important. If you alternate so the triangles are on the top or the bottom, to the left or to the right, great. If you screw up (like I did on the last piece I made) no one will notice (I didn't notice my screw-up until today...)
And here is the piece with organza triangles folded back.
I spent about an hour auditioning bits and bobs to place in each exposed triangle. I have findings which I purchased and pieces of deconstructed jewelry. This part is time consuming because you don't want one triangle to overpower another or the items not compatible one to the next. I tried the buttons but they didn't look good (too big).
And this is the layout I decided to use.
Some of them are not terribly visible on the lighter fabrics but I will attach them with embroidery thread and/or beads and that should make it better, I hope..
Triangles tacked down.
Revealed triangles with findings attached with beading or threads.
Chose a backing fabric from upholstery samples picked up at Guild meeting years ago.
Then I quilted the quilt sandwich with zigzag stitching. I first tried the zigzag in a contrasting thread but decided that less is more and just used a silver grey thread. I zigzagged on the previous seams except for the outer border.
I quilted before I stitched the perimeter because I wanted to add triangle corners on the back so a dowel can be inserted for hanging.
I zigzagged around the perimeter, twice. Unfortunately, there are some places where the batting shows to the front. I will look for a grey Sharpie to colour them.
Finished front.
Finished back with hanging triangles.
Then a "haircut" to cut off any organza frays or other fabric fraying.
Lily Homer: Spanier Arbeit is
a bobbin lace technique. It is the only textile technique that we know
of that is exclusive to Ashkenazi Jewish production, and it is made out
of fiber that is wound around itself to build up surface area. The wood
jig that spanier arbeit is
made on looks vaguely similar to the other jigs that bobbin lace is
made on, but there are a couple of key differences including the way the
bobbins are hung, and the use of gravity through that mechanism to hold
the lace in place.
JK: And how did you find spanier arbeit?
LH: I read about it in 2017 in Ita Aber’s book, The Art of Judaic Needlework. I read it right after I completed my college thesis, which was in large part metal-based lace work. The description of spanier arbeit in Aber’s book is amazing. She mentioned that spanier arbeit is
considered “unique” to Jewish production. The book included an image of
it that I thought was beautiful, so that is when I started trying to
Google around and found that there was not much information available
about spanier arbeit.
Dr. Ann E. Wild of Freiburg, Germany
knows this lace, and she produced some in Germany. She says she is only
aware of two other people in the world who still work the technique on
the original loom and they are both in Brooklyn — Mr. David Farkas and
Rabbi Yosef Greenwald. Ita Aber is an American woman who makes this lace
and is largely responsible for the growing body of more accessible
essays and literature about it. I’ve tried to reach her but haven’t
succeeded yet. And these are the only two women I know of that can make
it.
It is not all that rare to see spanier arbeit around in Orthodox communities. I have probably seen it in shul
or when I had an Orthodox bat mitzvah, since there were a ton of very
fancy articles of clothing around but it obviously did not register. It
wasn’t until I read that it was really important in a historical context
that I started actually taking interest in spanier arbeit.
JK: So, based on the samples you’ve seen in person and online, could you describe what spanier arbeit looks like?
LH: Spanier arbeit is composed of various patterns: some people call one of the most popular styles of spanier arbeit
“fish scales” because the pattern almost looks like semi-circles
layered on top of each other in rows, and then subsequently copied up to
make rows of layered circles. Spanier arbeit patterns are sometimes more floral. They exist as an embellishment, so the spanier arbeit pattern
is usually attached onto the outside of a garment. For example, with
skullcaps, they’re made into six triangles of various designs, and then
those triangles are sewn together to make a kippah. The fiber used to
make spanier arbeit is
a pliable fiber, it is bendable, but it is not super bendable, so there
is some limit to how you can wrap it around itself. It usually ends up
being curved.
One other pattern is called Kasten, where spanier arbeit functions
just as a border. Giza Frankel, in her book “Little Known Handicrafts
of Polish Jews in the Nineteenth and Twentieth Centuries,” lists the
different kinds of patterns. Atara designs specifically are made of two main parts: the central design “mirror” (spigel) and the border “box” (kasten). A very common design was fish scales (liske). Others are: magen david, menorah, rosettes, stars, hearts (herzele), three snakes (drei schlangen), jug(kriegl), eye (oygele), leaf (bletl), and head (kepl).
Different sects of Hasidim embraced certain designs over others,
distinguishing one sect’s garb from another’s. For example, the Ruzhin
design was a rosette and the Sasów design was heart shaped.
The actual physical form of it is
symbolic. In order to make it, lace makers take these long, distinct
fibers and wind them around each other. They will take hundreds, if not
thousands, of feet of material, and condense it or contract it into a
small surface area. The technique is about hiding the amount of
material. Essentially, the lace maker tries to package too much of
something, something that would not function alone as a decoration, into
something that we can recognize as a surface area, by wrapping these
materials around themselves.
JK: I’m gathering that there are a
few metaphorical interpretations we can make out of that process. Now,
do you know of the earliest example of spanier arbeit that exists? Do you know how old it is?
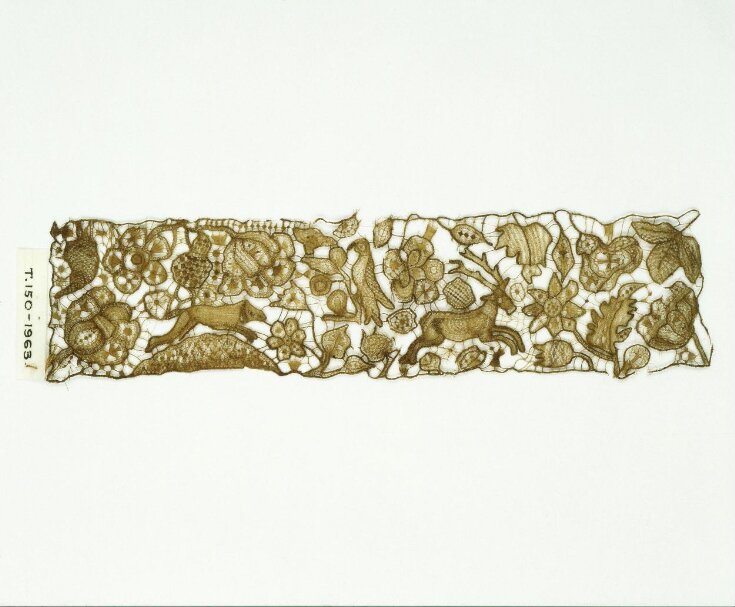
Prayer
Shawl Neckbands [Sphanyer Atarot]. Poland, late 19th to early 20th c.
From: Juhasz, Esther, et al. The Jewish Wardrobe: from the Collection of
the Israel Museum, Jerusalem. 5 Continents Editions, 2019.[Image description: Examples of laced fiber in various designs on the neckbands of tallitot.]
LH: The common belief is that there was a 13-year-old boy named Mordehai Leib Margulies, who fled the khapers
(“catchers”) in Ukraine around 1830 and set up a workshop in Sasów,
Galicia, which is now Sasiv, Ukraine, and produced what we consider the
earliest example of spanier arbeit
in Sasów, the one-time center of production. Before the examples from
his workshop, I do not know, but it was thought to have been first
developed earlier, in the 18th century. Margulies was making the atara, which is the neck band on tallises. I would guess that’s the earliest version. I’ve also seen very early examples of it on tachrichim, in whichthe neck band is decorated. So this lace does not exist on just the tallises, it exists on funeral smocks, women’s breast plates, waist bands, collars, bonnets, skullcaps, kittels, and cuffs.
JK: So what’s the role of spanier arbeit in attire? What purpose does this lace technique serve on the items you just mentioned?
LH: It is decorative. I think if
you’re using it for a religious purpose, one could consider it as having
a function, essentially intending spanier arbeit
to be a part of any religious service. However, it literally serves a
decorative function. It was originally pretty expensive, so it was for
special occasions and probably only accessible to the wealthy.
Through all my exploration, I find a
tension between this being an exclusive, religious technique, and this
being a decorative garment covering. Is it sacred and controlled or is
it a lucrative trade subject to changing styles and market demand?
The metals used in spanier arbeit,
precious metals, oxidize over time. When they oxidize, they turn green
and then they disintegrate. What’s left after the metals disintegrate is
the cotton or wool core from the inside, so it looks quite odd. The
older samples that have not been saved very well look like decomposing
skeletons. They’re essentially half rope and half green metal. You know
what the craftsmen intended to do, which is make this perfect adornment,
but what’s really there is bubbling to the surface.
JK: What is the history of spanier arbeit production?
LH: The first spanier arbeit
factory opened in 1830, and it was popular through the middle of the
19th century. However, by the early 1900s, it had somewhat faded from
popular style. But it was still being made by the Shoah. The hub of spaneir arbeit
production was in Poland, and 90% of Polish Jews were murdered. Let’s
say that there were 200 people making this technique in Poland. That
would leave 20 people who might have known how to make it after the war.
And how open are you going to be,
after a trauma like that, about making Jewish crafts for Jewish
consumption? Probably not very, right? There probably was a period where
it wasn’t being made, but I know that it was able to travel outward
from Poland, if in very small numbers. There are people who make it in
Jerusalem and sell it in the markets there, and there are people who
make it and sell it in Brooklyn.
Those are the two places I know it
can be bought. But compared to what it was before the Holocaust, it is
decimated. And even before the Holocaust, it was much less popular than
it was at its peak.
JK: Going back to what you mentioned
earlier about Ita Aber saying this craft was “unique” to Jewish
production, could you elaborate on what makes this craft uniquely
Jewish, and specifically Ashkenazi?
LH: As far as we know, it was
invented by Jews in Eastern Galicia or what’s now the eastern part of
Poland. It was made exclusively by Jews because they were able to keep
it secret enough to maintain the technique. They were able to keep it
word of mouth. It was sometimes bought by gentiles, but my understanding
at this point is that the vast majority of it was made for other Jews
for ceremonial clothing.
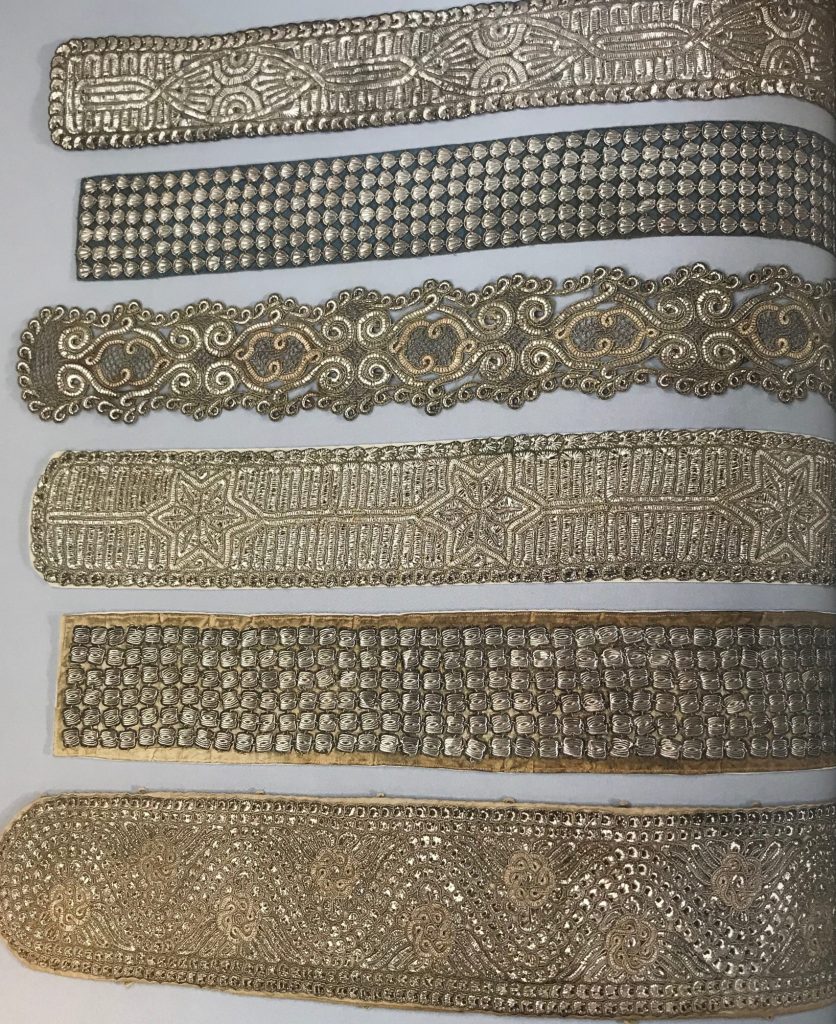
Spanier arbeit loom. Sasów, Poland (now Sasiv, Ukr.), late 19th–early 20th century. (Museum of Ethnography and Crafts, L’viv)
[Image description:A black, wooden loom for making spanier arbeit. The rotating drum sits on a raised platform and a frame for hanging bobbins is constructed behind it.]
I think the big wooden loom is a
distinguishing feature as well. The process used to produce the lace is a
big part of what makes it unique. This is also a reason I’m hesitant to
simply look at samples of the lace and make up a way to reproduce it.
The jig, with its big rotating drum, and frame for hanging bobbins,
seems fundamental to its place in Jewish history.
JK: What differentiates spanier arbeit from other Jewish crafts?
LH: There’s a long history of Jewish metalwork. Jewish crafting on the Iberian Peninsula before the turn of the 11th
century is a good example of a flourishing metalwork culture. I think
other groups would commission Jewish handiwork, which helped this
culture develop.
When I think of other Jewish crafts, I
think of paper cutting, ceramics, and manuscript illumination –– very
different types of media from metalwork. Like with similar techniques to
spanier arbeit found
in other cultures, there is a lot of overlap with these crafts as well.
When small populations interact and share traditions, and since Jews
migrated (forcibly) for thousands of years, there is bound to be
stylistic similarities, if not duplications.
There’s also one style of
architecture that is exclusively Jewish, which is the wooden synagogue.
There were a couple hundred in Poland and they were all burned down in
the 1940s. There are approximately 12 left, and they are all in
Lithuania. The insides of these wooden synagogues are intricately
painted. They’re full of color, aphid and floral and geometric designs
on the inside, whereas the outside is a nondescript wooden building.The
torah cover is very intricately designed and the door to the Torah arc
is supposed to resemble the door to heaven.
I think spanier arbeit
and all of these other examples fall into a category of intricacy.
There’s a common thread of intricacy and detail in Jewish art, which
speaks to the importance of craftsmanship: our labor over these objects
can represent our commitment to G-d. Synagogues and metalwork are also
materially opposed to paper cutting projects, which are gorgeous, but
ephemeral. There is no expectation of longevity or permanence.
The challenge was to create a piece, using "chance" to determine some or all of the elements, and to have the piece "Judaic", either in size, number of stitches, theme, or something else not previously pondered by me.
I had made a piece several years ago, making a 6 square by 6 square grid, using duppioni silk squares and beads, employing the drawing of lots and beading. (6 X 6 = 36, double chai and finished size 18" ish.
In keeping with my recent practice of using what I have, I decided to needlepoint, using this bin of needlepoint yarn passed on to me by Nora Freund.
This time I chose to again make a 6 X 6 grid, but each 3" square to be needlepointed, the yarn colour placement determined by drawing of lots. I got to chose the 36 colours but I pulled those 36 skeins one by one from one bag and the corresponding slips of paper with the location from a second bag.
Here is the grid I worked from.
I only changed the needlepoint yarn from those drawn by lot if the yarn was thicker than the canvas allowed and then, I stayed true as much as possible to the original colour chosen. I also admit having changed one position - A1 and A2 were switched because the blues of A2 and B2 were too close in colour, IMHO.
I didn't realize that needlepointing was so time consuming, since each square took between 2 to 3 hours to complete.
This is the finished needlepoint.
This is the needlepoint back, which is interesting in itself because of the texture where start and finish thread were covered.
So I had a lot of time while stitching to think about what I would do with the finished needlepoint. I had thought about turning it into a "snakes and ladder" board. In the end, I decided on buttons and used the "roll the dice" method of determining the placement of buttons on 18 blocks. I rolled two dice (one with letters A-F, one regular with numbers) to determine which squares would get buttons, and then an additonal di marked with biblical directions from B'reishit: yamma (west), kedma (east), tzafona (north) and negba (south) and the last two mercaz (centre) and ani (me - I get to decide). Here are the dice.
And here is the card recording the dice rolls.
And here is the finished product.
Now I have to decide whether to frame it or finish it as a wallhanging.
BTW, I calculated the estimated number hours of needlepointing multiplied by Ontario minimum wage and the finished piece, unframed, is approx. $1,500.00. Anyone interested in buying it?...
Other than a brief hello when I went to pick up something from Susan, I did not know Merv. Susan had gifted me some white cotton shirts which Merv no longer wore. I cut one up and when I was dyeing silk scarves with remnants of silk ties, I put in a few cotton pieces from his shirts. The dye result on the cotton was nowhere near as vibrant as on the silk.
I decided to use them in another project and had gotten as far as quilting 3 squares with random quilting lines and "framing" the squares with a rich burgundy duppioni silk from my stash.
Unfortunately, Merv passed away. At Merv's funeral, one of the eulogy's themes was "שם טוב טוב משמן טוב" (from Kohelet - Ecclesiastes) which loosely translates: one's good name is worth more than material goods. And indeed, from what I heard, Merv truly had a shem tov.
I decorated each cotton square with fabric beads I made from leftover silk tie pieces. Then I fused the biblical saying Tov Shem MiShemen Tov" in white duppioni Hebrew letters onto the piece and finished the back with a lovely floral piece from my stash.
Now that I have given the piece to Susan, I can show it here.
Most of what I learned about accordion books, I learned from reading Cheryl Lynch's blog or watching her videos. She has a series of 6 videos which show her work, and show her process. I am listing them below. Our Lunch and Shmooze group will do a stitch-a-long based on them after Pesach.
The first episode is a show and tell about fabric books she has made.
The April 17, 2024 POM meeting will be about Fabric Books.
There are many kinds of books fabric and textile users make:
books for children and grandchildren
Reesa made this book for her granddaughter:
books to provide visual reminders of stitches and/or techniques
Barbara sent me these photos of books she has made. [ Unfortunately, I was unable to upload her pictures here. I forwarded her emails and attachments to Shirley who was able to make a powerpoint presentation from Barbara's images.]
books to catalogue previous projects, with leftover fabric, practice pieces, or extra finished pieces not used in the finished project
Honey is making a quilt with blocks leftover from previous quilts she has made. Instead of a quilt, a fabric book could be made.
memory books of trips taken or family events or holiday gatherings
https://thequiltshow.com/quiltipedia/who-is-cheryl-lynch (see folding books)
or
just books from stuff you liked.
I will be sharing with you three books I have made. Full disclosure - none of the ideas for book types is original. None of them have superior workmanship. Most of the ideas came from the internet, especially Cheryl Lynch who has a series of youtube videos showing how she makes her fabric books.
Back to me...
The first book I made was for a shadow box challenge of our guild - People of The Book.
The size was determined by the shadow box provided - 6 1/2" square and 2" deep.
I decided to do an accordian style book, using blue fabrics and embellishments in my stash. I took five 6 1/2" squares of fabrics leftover from previous crazy quilting projects and attached each square to a similar sized square of quilting batting.
I made it personal by having each square connected by "degrees of separation" from the next.
I searched for a "biblical" theme and chose "tzena u're-ena" from Shir Hashirim. My first square was the Hebrew words, stencilled in white.
The second square was a nod to my singing days in a classical choral piece by Yehezkel Braun. The abstract notes were white beads on machine stitched lines. [link to youtube]
The third square was a nod to my Yiddish studies at the University of Toronto. It was the biblical passage from an actual "tzena u're-ena" book. Tzena u're-ena books were books written in Yiddish for women who were prevented from learning original hebrew texts and could only learn from a "reasonable facsimile" in Yiddish. I photocopied the passageTzena and printed it onto silk, and attached it to a background made from one of my father's ties. [link to IBN]
The fourth square was a nod to my love of folk music. "Tzena Tzena Tzena" was written by Issachar Miron in 1941 to lyrics by Yechiel Chagiz while serving in the Jewish Brigade of the British Army in British Mandate Palestine. Pete Seeger was introduced to the song in 1948 in New York, brought it to the Weavers, and the rest is history. I represented Pete Seeger's banjo with a circle and shiny threads.[link to youtube]
I finished off my final square with a "word art" piece in Hebrew, from the original text, printed onto silk. [link to word art]
So now I had five small quilts and had to turn them into an accordion book.
I stitched the five quiltlets together into a row. Then I took a piece of cotton suede fabric and sewed it envelope style as a backing.
Now the tricky part. For the book to stand alone outside of the shadow box, it needed a stabilizer. I cut five squares of Timtex (flexi-firm) stabilizer approximately 6 1/4" square. I slipped the first one into the envelope, then sewed on the stitch line,
and continued in the same manner for the next four squares. I stitched the envelope closed.
As the Timtex is not connected from one square to the next, it can be folded accordian style.
Questions?
My next book is very simple. Years ago, I took part in am IJQ postcard exchange on the theme of Purim.
The reason I never took place in another postcard exchange was: what to do with the postcards? They are too lovely to throw out but what can you do with single postcards?
You can make them into an accordian book. I took invisible thread (the clear plastic type) and zigzagged the cards together.
Now I can pull them out at Purim, stand them up on the sideboard, and enjoy.
The final book I am showing you I made specifically for this presentation. I wanted to show how you can take individual pieces and bind them together to make a book. It can be a stitch book or memory book or, in my case, a book of necktie leftovers.
I wanted to try a technique using coil binding so that the pages of the book lie open flat. And you can use any size page you want (postcard size, full page, etc.) The basic premise of the coiled book
is the page piece, sewn onto a folded piece of card stock, and the card
stock is then coil bound. So obviously, unless you have a binding
machine at home, you will have to take it to a Staples or UPS store to
have it bound. Or you could just punch holes in the card stock and put in rings.
You may remember I showed you how to use necktie pieces to dye a silk scarf. The pieces can apparently be used to dye again, but I instead used them to make fabric beads. But how many beads does one person need? So I was left with these long narrow strips. I tried weaving with them but it was too fiddly. So I took a piece of steam-a-seam fusible and fused the necktie strings to it. And it looks like this framed
Why couldn't I use them in a book? I could and did!
I was using Timtex (the soft kind) for the "batting". What would I use for the front and back of each page? I went into my "failed" projects bin and pulled out snow dyed silk pieces. I sewed the strings in a few strategic places to the dyed silk et voila - page one's front done.
Now I also have a container of what I call "kishkas" - these are the necktie linings. I had started doing stuff with them and this page in one of the examples - I zigzagged pieces of duppioni silk remnants onto the lining and zigzagged it onto another dyed silk failure. Then I zigzagged together the three pieces (front with the strips, batting, back with the duppioni pieces).
Then I cut from a file folder (i.e. cardstock) a 2 1/2" strip. I folded it lengthwise in half so each "half" is 1 1/4" wide. I then marked a line at the 3/4" mark on the bottom half and inserted the page up to the line, folded the top half onto the bottom and sewed on the sewing machine with the longest length stitch (if the stitches are too close together the perforations will make the cardstock more susceptible to tearing).
Onto the next page. I decided not to use Timtex but to use regular quilter's batting instead.
Each tie has a lining piece of silk at the top and bottom tie triangles. I hadn't decided what to do with those pieces (not true - I decided but it failed...) so I cut out 2 1/2" squares of lightweight iron-on interfacing to the backs of these triangles, cut out the squares and sewed them into a square, and lightly quilted them. On the back of this page, I sewed on a tie shaped piece of necktie lining and attached necktie beads to it. On this page, instead of zigzagging front and back together, I envelope sewed it.
For my last page (yes, it's only three pages - I ran out of steam) I sewed pieces of the triangle linings onto a tie shaped lining, and sewed onto that some of the tie labels.
And for the back, I took one of the tie shaped lining pieces and sewed onto it the tie pieces that hold the back necktie piece in place. This one I again zigzagged, not too well, the three pieces together.
What I learned from this exercise is that I should probably make sew the cardstock onto the "naked" Timtex pages and then decorate the pages - otherwise it is too difficult to manipulate under the sewing machine.
All in all, the presentation was well received. I promised to provide resources which I will do in a separate post.
Sarah Homfrey https://www.youtube.com/watch?v=TTz6xXyvq-c


