Tuesday, January 2, 2024

Dupionni Bits and Pieces

 When Inbal visited Arizona pre-Covid, she brought me a gift  - two small wall hangings, each a 2.5" ceramic square attached by beads to a small dowel.  Unfortunately one broke.  I brought the survivor to my studio to figure out how I could make little wall hangings from textiles.

 I decided that today I would make little wall hangings. 


There was a time when I used a lot of dupionni silk in my work.  That was in the days when Fabricland was across the street from my place of work and Fabricland still carried dupionni in many colours.  So I have a small container of dupionni bits and pieces.

I also attended a POM workshop where Timtex (stiff interfacing), some fusible, some not.  The pieces that were not used ended up in the garbage.  Or would have because I, without shame, rescued them.  Granted, the leftover pieces were oddly shaped - a piece with a hamsa or apple cut out from the centre.  from the pieces I saved, I was able to cut out 9 2.5" squares.

I decided that today I would make little wall hangings. I fused strips of dupionni to the Timtex squares.  Then I stitched them down - some with my machine's embroidery stitches, some straight lines.  I used my brown, umbra, beige, and green bits.  When I finished, I realized they would have more impact if I used them as a group in 3 rows of 3.

I auditioned them on three backgrounds, one a beigish striped fabric, one a dark green faux suede and one an ecru (to avoid using the word beige again) faux suede.  Once my camera and laptop are talking again, I will upload the 3 images and decide which to use.


Ringing in 2024


I have one New Year's Resolution - do better.

In terms of my blog, I will try, as I have in the past, to blog daily about what I am doing creatively.  Maybe this year it will work...

I took a quick look at my 2023 entries, of which there are few, mostly related to techniques I shared with the Pomegranate Guild("POM").  It gives me great pleasure to be able to share techniques I have learned with POM.

My first 2023 entry was about snow-dyeing.  I know nothing about the chemistry involved.  For example, the previous year I had gathered snow-ice from the shavings of the local skating arena, not knowing that there is ammonia or something in the ice which neutralized the fabric dyes so I dyed fabric with vibrant colours and the end result was barely visible colour.  In January, I snow-dyed silks and the resultant pieces were "eh" to say the most and those pieces languished on my shelf until Devora gave a weaving demonstration and I had my "aha" moment.  I used four pieces of snow-dyed fabric for weaving and ended up with these:


On the pink piece, I backed the silk pieces with stabilizer.  In the "warp" piece, I cut approx. 1/2" slits.  The "weft" piece was cut into 1/2" inch strips which were then woven through the warp piece.  I used a piece of pink dupionni silk from my stash to frame it.

On the blue piece, I only sewed stabilizer on the weft piece before cutting into strips, then wove.  You can see that the warp piece frayed somewhat and I'm not sure whether I like the additional texture of the frayed silk but it's there.  This one I framed with a blue linen from my stash.

So my resolution to use what I have started at the end of 2023.

That said, I did make a purchase last week.  I bought fusible light-weight stabilizer and soluble film (similar to Solvy) from Marathon Threads in Winnipeg.  I rarely order online (i.e. next to never) but I had ordered from Marathon a few years ago for the fusible stabilizer for the neckties in the Torah Tie Project. I didn't remember the name of the fusible but Michele from Marathon was able to look it up for me and my current order arrived next day by courier.  So I'm ready to go.

I also signed up for Just Get it Done's 2024 Declutter Challenge which starts today.  I don't have the same problem as some who have boxes and wrapping paper etc. in their sewing spaces, although I do have a bed I'm trying to get rid of which, once gone, will free up floor space so I can better organize the room.  

OK, so first resolution (to blog regularly) off to a good start.


Thursday, December 14, 2023

Fabric Weaving

 Devora gave a Lunch and Shmooze demonstration of fabric and/or paper weaving yesterday.

And it got the creative juices flowing.

She demonstrated a weaving she was doing, using a practice piece from another workshop as the warp (vertical lines).  I got to thinking about some duppioni silk pieces I had snow dyed several years ago.  I never did anything with them because the colours weren't as vibrant as I had anticipated.

I pulled out the snow-dyed pieces, backed them with iron on lightweight interfacing (the ironing didn't totally adhere...), cut them into 1/2" strips and wove away.

This is the finished product:

I will add, when my cellphone recharges, photos of similar whole pieces before cutting up.

Now what to do with it?

Sunday, December 3, 2023

Fabric Flowers

Full disclosure:  I did not invent this method of fabric flowers.  I saw it on youtube.

I may demonstrate live at our upcoming Lunch and Shmooze but my hands shake, sometimes to the point of distraction so I will do a photo description and if my hands cooperate, a live one.

First things first:  fabric.

I have done this with silk (leftover from silk ties without interfacing), polyester blends, and cotton.  I have not tried denim or heavier weight fabrics.

I work with freezer paper, making my template(s) using a paper or styrofoam cup.


I cut a piece of freezer paper big enough to make 5 top rim circles and one bottom circle piece. Since freezer paper can be used multiple times, if you have pieces left over from other projects, you can cut the templates from them.  The templates don't have to be in a row or a square.

Iron the freezer paper, shiny side down onto the back of the fabric.

Cut out around the fabric with the template, leaving the freezer paper adhered until you're ready to sew.  Set the smaller circle aside.


Remove the freezer paper, one piece at a time (don't throw out the freezer paper - it can be reused up to ten times before it loses its "stick").  Fold the circle in half, front side of the fabric to the front.  Then fold again.  You should have a quarter circle (the "quarter").  Put a pin in it so it doesn't reopen.  Repeat four more times.  


Don't worry if the unfinished edges don't exactly meet - they will not be visible at the end.

Thread a needle with a thread long enough to sew a running stitch through the rounded edge of the quarters connecting the quarters.  The running stitch should be an 1/8" to a 1/4" from the edge, being sure to go through all four layers., all the way around. 


Pull the two ends of the thread to gather the squares as tight as possible and tie the ends together.


Take your remaining circle, with freezer paper removed, and sew a running stitch all the way around.  Put your button on the wrong side of the fabric, pull the thread to gather around the button and tie the thread ends.  Sew the button circle on top of the flower.


Or you could just omit the final circle and attach the button as is directly to the flower.

 The finished flower

n

Fuller disclosure - my hands were shaking so much that I couldn't gather the stitches properly, but you get the idea, I hope.  I may have to rethink the intended project...


Thursday, November 16, 2023

In Memory

Wednesday, October 18, 2023

Mazal Finds Us

Dice Drawing No.4 (50 in 4262, From Left and Right) | Nick ...

I was visiting Carmit when she lived in Preston, UK.  While she worked during the day, I wandered around Preston which has a museum/art gallery.

There I saw Nick Kennedy's "Dice Drawings".  (If you google Nick Kennedy Dice Drawings, you can see a lot of different works). His premise is to decide on the medium, rules of engagement, and let dice dictate placement and use of media.  Long story long, his medium is paper and pencil.  He made an "x" in the middle of the page, rolled a die trying to hit the "X", and where the di landed, he used a manual counter  to record in blue pencil the number appearing on the counter.  If he hit the same number twice in a row, he switched to a red pencil.  After many rolls of the die, and switching pencil colour, he reached the number on the counter which he had set as his goal.  The result: Dice Drawings.  

 It looks like a swarm of bees but a closer look reveals the marks are the numbers appearing on the counter.
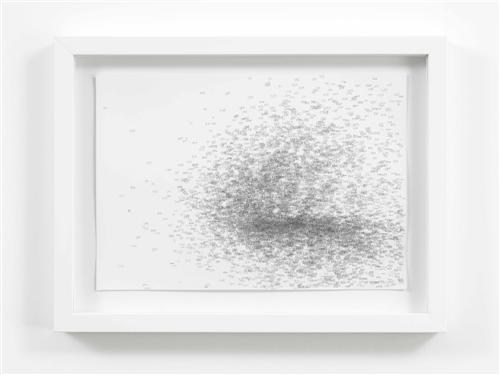
Dice Drawing No.1 (3333)

When I got home, I kept thinking about how I could use the premise - i.e. leaving the placement of stitches up to chance.  After contacting Nick and obtaining his permission to steal borrow his idea, I thought hmmm, how can I do this in textiles?

My rules of engagement were:

1,    to use fabric on hand.

2.    to give the piece Judaic content.

3.    to break the rules if necessary, me being the arbiter of necessity...

For fabric on hand, I had leftover dupionni silk from other projects in many colours.

For Judaic content, I thought "chai".  If I make the piece an 18" square, that's chai.  If I made the piece from 36 dupionni squares, chai again.  And if I use 3 dice, yet again chai.

How to choose the fabric colours and placement?  I didn't have 36 different colours but I did have over 18.  So I made a grid of 6 blocks across and 6 blocks down and identified each A1-6, B1-6, etc.


1

2

3

4

5

6

A


B


C


D


E


F


If I used 18 fabrics, I could use each colour twice, the first in A-B-C 1-6, the second in D-E-F 1-6.  I hope you're getting the visual.  Just imagine each cell is 3" square (because I haven't figured out yet how to make the table yet.

OK.  So now how do I decide on placement?  By casting lots, obviously.  A Jewish tradition going back to the Torah. See Leviticus 16:8.  So I put fabrics squares for A-C in a bag, and slips of paper numbered A-1, A-2, etc. into a separate bag.  I pulled a square from the fabrics bag and a slip of paper from the papers bag and voila.  The colour and its placement on the grid.  The process was repeated for D-F.  So if I pulled out, for example, a blue fabric square and a paper slip marked A-3, the blue square would go into A-3 on the grid.  And so on until the entire grid was filled.

But could I leave it alone?  No.  I broke the rules by deciding that I could roll the die once for each half of the grid.  The number on the face of the die would dictate how many squares I could move around and reposition, up to a maximum of 6.  My luck, it fell on 1 on each roll.

So that takes care of the placement of fabrics.  I sewed them into rows and then joined the rows together in numerical order.  However, I wanted to bead the squares.  New Rules!

 I was going to bead 18 chai squares.  To determine which squares to bead, I rolled two dice, I one marked A - F, and the other with the regular 1 - 6 dots. 

 Then to determine how many beads to bead at each location, I rolled 3 regular dice (maximum of 18 beads per square). 

(Sorry, haven't figured out how to rotate photo yet...) But you get the idea, I hope.  I had two rolls for placement which were duplicates so I had to roll again.


I got to choose the type of bead and how to bead on each square. 

The almost finished pieces was not quite 18" - it needed borders.  So I left the final decision of whether to do a border of one colour the entire perimeter or one colour on each side up to the member of the Pomegranate Guild.   They chose one colour for the entire border.

And this is the finished piece, not the best photography but a future challenge.

What I learned: a new for me word "aleatoricism" which is defined as the incorporation of chance into the process of creation, especially art or media, from Latin "alea", the rolling of dice.

Still contemplating a series of 6 X 3, 2 X9... or perhaps I could use fabric instead of paper and make a mark with a pen and then cover it with an embroider stitch.  Or use silk and permanent markers and rubbing alcohol, or...


 And a little about the use of dice in ancient history: