Wednesday, January 12, 2022

Chaya tries Papermaking

At the start of the pandemic, I ordered some handmade paper from "The Paper Trail" in New Dundee, Ontario  (west of Toronto, south of Kitchener).  They also teach papermaking and I was planning to entice Devora out to take a papermaking workshop.  Devora gave me her mould and deckle, leftover either from her OCAD days or something.  Needless to say, Covid put the kibosh on the workshop idea.

A few month ago, Menachem and I went for a drive in the country.   When we stopped at Tim Horton's in Lindsay for coffee, I went into the Mission Thrift Store for a look-see.  I wasn't really looking for anything but when I saw a blender for $7.99, the light bulb over my head said "papermaking" and I couldn't resist the idea. This blender is now dedicated to art only, no food!!

I still wanted to pay. I mentioned the blender and papermaking on one of the POM Lunch and Shmooze meetings.  Shirley asked me yesterday when I would share my papermaking journey with the group.  Since today is my day off work, I decided to get organized and see what I could do.

I started yesterday by watching a whole bunch of youtube papermaking videos.  I am not following one particular video but looking for the fastest and easiest method.  Funny how I have patience to spend hours stitching but am impatient for other techniques.  And, I don't like to get my hands dirty (i.e. repeatedly dipping my hands into deep water with paper pulp, or for that matter with clay, or sand, or messy dyeing, not to mention ground meat...)

OK. So here we go.  These are the materials needed:

A blender. 👍


Paper for recycling 👍


Anything you want to add to the paper.  👍 I am going to add cut off threads, cut into lengths short enough so they don't wrap around the blades and cause the blender's motor to blow.

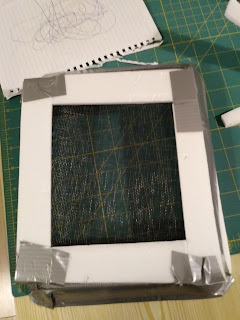
A mould and deckle. 👎 Devora's is too big and clunky.  I am going to try to make one from styrofoam, duct tape, and screening. 👍  OK, not my best attempt but it may work.


A basin to hold water into which the mould and deckle fit. 👍 This tray is leftover from my snow dyeing days.


Old towels. 👍

Paper towel, or fabric (cut up old sheets) or craft felt.👍

Step 1:  Soak paper, torn into approx. 1" squares in warm water, for several hours.  It is now 10:30 am.  I will revisit in about 4 hours.  Notice how I am using the blender cup to soak the paper.  Not sure if this is a good idea but I am also queen of using as few dishes as possible to lessen clean-up.😁


in the meantime I am turning this pile of threads into shortened lengths.

 So four hours later, I blended the pulp.


Added the threads, blended some more, and poured the pulp onto the screen which was submerged in a bigger container than I had thought to use.  Note to self, next time use a wooden frame - the styrofoam floats...

I ended up with three "sheets" of paper, tinged pink from the red threads.


They now have to dry.  I thought of ironing them dry (actually I tried but did not succeed).  I also saw that you can use a hair dryer or if you have a dryer with a shelf for shoes, sweaters, that you can dry them on a low heat.

Frankly, at this point, I have lost interest so I'm just going to let them air dry.

So the question is, will I continue papermaking?  I'm not saying yes, but I'm also not emphatically saying no.  So I guess that's a maybe?


Thursday, January 6, 2022

Kishkas (or Guts)

 I was gifted a lot of silk ties - read my Torah Tie Project blog.

Anyways, after gutting the ties, I had this humongous bag of tie guts, or kiskhkas, the Yiddish word for intestines.  

I am in the process of decluttering, or in my case re-organizing because I really don't have all that much to declutter.  Since I am home today with a headache and intestinal distress, I decided to figure out what to do with the tie guts thereby getting rid of a large bag sitting on the floor.

I decided only to work with the wide triangle end of the tie gut, am ironing them and then will cut them to 18 inch lengths.  My idea then is to dye them - snow dyeing, marker and alcohol, shaving cream marbling, and embellish with stitching, beading, embroidery, etc.

This new project is temporarily being called "Chai-ish" or "Kishkas".

Didn't want you to think I am lazing about.

Oh, did I mention that I replaced my standard ironing board with this ironing station that Menachem made?


BTW, the bag to the left of the ironing board is not the kishkas, but rather the tie strips for the back of books 2,3,4 and 5 of the Torah Tie Project.


Saturday, January 1, 2022

2022, for Better or Worse

I am making no New Year's Resolutions because I never manage to keep them.  I will, however, try to be mindful in what I do.

This is the second (or is it the third) year where I am buying as little fabric as possible, using up the stuff I have.  

I have joined Karen Brown's 2022 Declutter Challenge but from the Facebook page posts of other participants, I see that I am miles ahead of many of them.  I am focusing on using what I do have.  In a previous post by KB, she talks about capacity, both physical and mental.  My physical space is limited - my sewing room shares space with my bedroom so there's only so much space to store stuff.  And mental capacity, well I don't want to think about having so much stuff in general, not only sewing stuff.

Most of my fabrics are off-cuts from previous projects.  I have been making scrappy quilts for a while now since Carmit introduced me to diagonal strip piecing.  I saw a video recently of a woman who has a fabric "pantry" where she keeps 2 1/2" squares, 5" squares, etc. so when the mood hits, she's ready to go.  KB also has videos of using up scraps.  Most of my fabrics are stored in clear plastic shoeboxes.  I think today I will make my own pantry from cut offs and see if I can turn the smaller scraps into strips of some sort.

Maybe I can finally use up the fabrics which don't match anything else that I bought when Quiltmakers on Avenue Road closed...

Wednesday, December 29, 2021

What I did today

Yesterday, I finished the perimeters of the Torah Ties.  Today, I started on the backs, by cutting out the 5 battings.  Now I have to determine the placement of the strips on the backs.  I guess tomorrow I will really get started because I am more energetic mornings, I got distracted with other things.  Mainly blogging, ha ha.  I may have an energy spurt in the afternoon.  Maybe not.

Actually, I finished one of the backs.  A little wonkier than I would like but it is the back.


Tuesday, December 28, 2021

Nod to Nick or Variations on Chai

I was going to write about the Torah Tie Project, but I got waylaid. 

I was visiting Carmit in Preston, UK.  While she worked during the day, I wandered around Preston which has a museum/art gallery.  There I saw Nick Kennedy's "Dice Drawings". https://www.nickkennedy.info/dice-drawings. His premise is to decide on the medium, rules of engagement, and let dice dictate placement and use of media.  Long story long, his medium.  He made an "x" in the middle of the page, rolled a die trying to hit the "X", and where the di landed, he made a mark.  After many rolls of the die, and switching pencil colour, he arrived at his Dice Drawing. 

When I got home, I kept thinking about how I could use the premise - i.e. leaving the placement of stitches up to chance.  After contacting Nick and obtaining his permission to steal borrow his idea, I thought hmmm, how can I do this in textiles?

My rules of engagement were:

1,    to use fabric on hand.

2.    to give the piece Judaic content.

3.    to break the rules if necessary, me being the arbiter of necessity...

For fabric on hand, I had leftover dupionni silk from other projects in many colours.

For Judaic content, I thought "chai".  If I make the piece an 18" square, that's chai.  If I made the piece from 36 dupionni squares, chai again.  And if I use 3 dice, yet again chai.

How to choose the fabric colours and placement?  I didn't have 36 different colours but I did have over 18.  So I made a grid of 6 blocks across and 6 blocks down and identified each A1-6, B1-6, etc.


1

2

3

4

5

6

A


B


C


D


E


F


If I used 18 fabrics, I could use each colour twice, the first in A-B-C 1-6, the second in D-E-F 1-6.  I hope you're getting the visual.  Just imagine each cell is 3" square (because I haven't figured out yet how to make the table yet.

OK.  So now how do I decide on placement?  By casting lots, obviously.  A Jewish tradition going back to the Torah. See Leviticus 16:8.  So I put fabrics squares for A-C in a bag, and slips of paper numbered A-1, A-2, etc. into a separate bag.  I pulled a square from the fabrics bag and a slip of paper from the papers bag and voila.  The colour and its placement on the grid.  The process was repeated for D-F.  So if I pulled out, for example, a blue fabric square and a paper slip marked A-3, the blue square would go into A-3 on the grid.  And so on until the entire grid was filled.

But could I leave it alone?  No.  I broke the rules by deciding that I could roll the die once for each half of the grid.  The number on the face of the die would dictate how many squares I could move around and reposition, up to a maximum of 6.  My luck, it fell on 1 on each roll.

So that takes care of the placement of fabrics.  I sewed them into rows and then joined the rows together in numerical order.  However, I wanted to bead the squares.  New Rules!

 I was going to bead 18 chai squares.  To determine which squares to bead, I rolled two dice, I one marked A - F, and the other with the regular 1 - 6 dots. 

 Then to determine how many beads to bead at each location, I rolled 3 regular dice (maximum of 18 beads per square). 

(Sorry, haven't figured out how to rotate photo yet...) But you get the idea, I hope.  I had two rolls for placement which were duplicates so I had to roll again.


I got to choose the type of bead and how to bead on each square. 

The almost finished pieces was not quite 18" - it needed borders.  So I left the final decision of whether to do a border of one colour the entire perimeter or one colour on each side up to the member of the Pomegranate Guild.   They chose one colour for the entire border.

And this is the finished piece, not the best photography but a future challenge.

What I learned: a new for me word "aleatoricism" which is defined as the incorporation of chance into the process of creation, especially art or media, from Latin "alea", the rolling of dice.

Now I'm off to shred the papers and contemplate another piece about chance.   A series of 6 X 3, 2 X9... or perhaps I could use fabric instead of paper and make a mark with a pen and then cover it with an embroider stitch.  Or use silk and permanent markers and rubbing alcohol, or...


Monday, December 27, 2021

It's December 26th but I'm declaring the start of 2022

 So I'm trying to get a headstart on 2022 creativity by summarizing 2021 and maybe 2020, maybe even 2019 when I last posted at my previous blog...
 
I guess I should start with the Torah Tie project I'm currently working on.  It's been ongoing for 8 months and I have made significant progress.  But let me tell you how it came about.
 
I am a member of the Pomegranate Guild of Judaic Textiles, Toronto or POM for short.   Menachem and I were in Israel in March 2020 for our son, Rotem's wedding with his bashert, Maya, when Covid hit.  My entire family, including my now 100 year old mother, had flights booked and one by one, they cancelled. Our daughter, Carmit, who lives in Munich also had her flight cancelled.  And then the Israeli guests cancelled.  Rotem and Maya ended up getting married with only her parents, her brother and sister-in-law, my daughter, Inbal, from Toronto and her children, Amit and Doron, and Menachem and me in attendance.  Rotem and Maya exchanged vows in their backyard, under the chuppah I had made many years earlier.  It was lovely, notwithstanding the extraordinary circumstances.

Around that time, POM started having ZOOM "lunch and shmooze" meetings.  Lunch and shmooze was a once a week in person get together of POM members, some of whom couldn't get out to our monthly evening meetings.  We have been meeting twice a week on Tuesday and Thursday lunchtime to chat, show what we're working on, learn new things, and share info, not exclusively textile related.  For me, the ZOOM meetings have been a source of creativity un a wonderful community

At one of our meetings, the moderator asked if anyone would be interested in ties - she had been approached by someone whose late husband had lovely silk ties.  Several people suggested me as a possible tie taker, probably because of a previous project I had done called "Marty's Ties".  


Marty's Ties was a big project and a daunting undertaking.  My cousin had given me her late husband's ties "to do something with".   There were close to 100 ties.  I used a pattern from a book by Christine Copenhaven called "Necktie Quilts Revisited".  For this project, I needed 108 different ties.  Fortunately, some ties were reversible.  So in the 108 tie wedges, there are no repeats. Those ties travelled from Israel to Toronto, where I pieced most of the top, Toronto to Munich where the quilt was quilted and finished by Carmit, Munich to Israel where Carmit met up with us and delivered the quilt to my cousin, Ruthie, back to Toronto for adjustments (Rotem had measured Ruthie's bed and his measurements were off - too large, I had to cut it down), and then back to Israel.
 
Ruthie loves the quilt, but I sighed a huge sigh of relief when it was done.  So when asked if I wanted a new batch of ties, I intially said NO!  Then I relented - hey, free fabric is free fabric!


.